
HORN CARE & MAINTENANCE
If you have just spent large sums on a new horn it is worth taking a little time and trouble to maintain it properly; these notes and diagrams will tell you how to ensure that your pride and joy stays in top condition, avoiding expensive repair bills and letting you get on with making music.
MAINTAINING THE VALVES
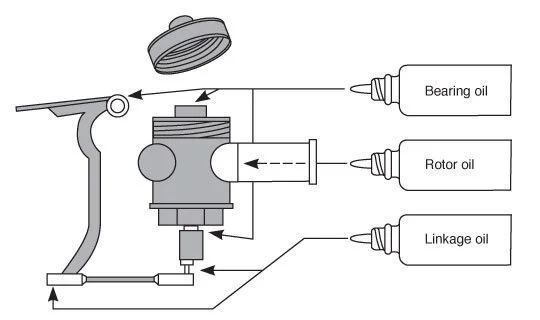
All modern horns are fitted with rotary valves which, by their nature, are rather more complicated than the simple piston valves fitted to trumpets. To keep them working properly and to prevent wear needs a simple but regular maintenance routine. Three different grades of oil are needed and the diagrams show where they are applied.
The bearings at the top and bottom of the valve spindle need regular oiling with a medium oil - Paxman Bearing Oil. Remove the valve caps one at a time, wipe away any old oil with a tissue and put one drop of Paxman Bearing Oil on the top surface, where you can see the spindle turning in its collar. Then replace the valve cap taking great care not to cross the very fine thread. Don't over tighten the cap, light finger tightness is all that's needed. The oil under the top caps isn't going anywhere except where it's needed, but the bottom bearing is a different matter. Here a drop of Paxman Bearing Oil is needed in the small gap between the fixed collar and the rotating part of the valve; because this is exposed to air and open downwards, oil naturally runs away from its correct place, allowing the bearings to run dry. Apply oil to each bearing by squeezing a small drop into each gap; then turn the horn on its back and move the levers for a few seconds until the oil is well into the bearing. It is particularly important to oil these bottom bearings regularly.
While you are oiling under the valve caps check that the marks incised at 90 degrees line up when the valve turns. If the marks do not line up it will mean that the corks or rubber stops underneath have worn and that the valves will not be opening properly. It is possible with care to replace these yourself but you may find it easier to get a good repairer to do it for you.
Mechanical actions, whether hinged or ball & socket type, need to be lubricated with a thicker oil than the spindles - Paxman Linkage Oil is very effective. There are three types of valve linkage in use, two of which are illustrated here. Not shown are cord action valves which do not need oiling unless there is a pivoting joint in the linkage (Yamaha horns in particular often have this), in which case follow the advice for the other types. Even if your horn has the three main valves operated by cord action, you will often find a mechanical linkage operating the thumb valve.
Proper oiling will prevent wear to linkages; and if there is any wear, can stop it getting worse, along with reducing the noise which is a symptom of wear. Apply a drop of Paxman Linkage Oil onto each joint - don't worry if it doesn't appear to get right into the joint immediately as capillary action will soon take it where it is needed. However, do make absolutely certain that no Paxman Linkage Oil is allowed to go where Paxman Bearing oil is applied. Should this happen, the valves will become catastrophically slow and 'sticky', needing a good deal of the next treatment to remedy them.
Over time slide grease and dust tends to collect in the valves and they become sluggish and sticky. The thinnest oil poured down the slides, and so onto the valves, will wash the residue away leaving your valves as efficient as they should be. Take out all the valve slides, but not the main tuning slides, hold the horn so the open slides are vertical and apply one drop down each. Try to get the oil straight down the middle to avoid washing any slide grease left in the slides onto the valves. Then, still holding the horn up, move the levers until you feel the valves improve. Carefully discard the waste oil. This treatment should only be done when it is really needed, but it does make a tremendous difference. The oil for this is Paxman Rotor Oil which has the advantage of some actual oil content (most thin oils are basically kerosene). Other alternatives are Holton valve oil, which most general music shops stock, Al Cass 'Fast' and 'Blue Juice'.
Mechanical Linkage: Ball and Socket Connecting Rod

Mechanical Linkage: Hinged Connecting Rod
GENERAL MAINTENANCE
SLIDES
It is very important that the slides move easily and are not allowed to become stuck. This is achieved with a suitable grease - Vaseline will do but Selmer Cork & Slide grease is better. Wipe off any old grease with a tissue - a drop of thin oil on the tissue helps this - and ensure that there is no old grease building up in the ends of the slides. Take a little slide grease on the end of a finger and wipe a band of it round the middle of the slide, this will spread up and down the slide as it is inserted into the horn. If the grease is applied to the whole length of the slide it tends to get pushed straight down to the end and onto the valves rather easily. Do this every couple of weeks.
CLEANING THE INSIDE OF YOUR HORN
It is important to keep the inside of the horn clean, but if the mouthpipe is kept clean then little other dirt will go further. The best way to do this is to use a pull-through.
The Paxman Pull-Through is made from plastic coated wire with a brush in the middle. To use it, remove the mouthpiece and the main tuning slide. Push one end of the Pull-Through into the tuning slide end of the mouthpipe and carefully feed it through until it comes out of the mouthpiece end, in other words from the larger to the smaller diameter. Then gently pull from the mouthpipe end until the whole Pull-Through has come through the mouthpipe. Rinse the Pull-Through and repeat until it comes through clean. If the mouthpipe has not been cleaned for some time, the first cleaning may result in a rather unpleasant spectacle - an indication to clean the mouthpipe more regularly.
It shouldn't be necessary to wash out the rest of a horn which has been properly cared for, but if a horn has been neglected over a long period then washing it through with warm water should be followed immediately by thorough draining and a complete re-lubrication to avoid the formation of verdigris in the valves. Likewise a horn being placed in store for any period should have the valves well oiled and operated regularly to ensure they do not become seized.
USE OF THE PAXMAN MOUTHPIPE PULL-THROUGH

CLEANING THE OUTSIDE OF THE HORN
If your horn is lacquered then all that is necessary is to wipe it clean with a duster or soft cloth. Over the years the lacquer will deteriorate where the hands are most often placed, but as this is largely due to the effects of perspiration, wiping the instrument after playing will help to keep the lacquer in good condition for longer. If the horn is not lacquered then it will normally have a dull appearance. It is quite safe to polish it with normal brass polish but, since this has an abrasive action it is wise not to do this too often.
CHANGING THE STRING ON CORD ACTION VALVES
The arrangement of the valve string bar relative to the cork stops may be in one of two positions and both are illustrated as A or B. Your horn may have all the valves the same or a mixture. Check and follow the diagram and instructions for whichever is appropriate.

Take a length of valve cord and tie a double knot at one end. Pass through hole as shown.
Take the free end part-way round the valve collar (anti-clockwise for A, clock-wise for B) having loosened the retaining screw on the spigot so as to accommodate the cord.
Pass cord (clockwise for A, anti-clockwise for B) under the spigot-head screw, and adjust position of lever to approximate level desired for the finger-plate. Tighten spigot screw temporarily.
Carry the cord (anti-clockwise for A, clockwise for B) around the collar, and pass along as shown to end-hole of bar and feed it through.
Hold collar-spigot against stop (as shown by arrow) and wind cord clockwise around end screw when taut. Tighten end screw. The level of the finger-plates may be adjusted by loosening the collar-spigot screw and then re-tightening. The screw at the end of the bar may then need a slight adjustment to take up any slack. Cut off the cord leaving about 2cm spare for ease in subsequent re-threading.
The level of the finger-plates may be adjusted by loosening the collar-spigot screw and then re-tightening. The screw at the end of the bar may then need a slight adjustment to take up any slack. Cut off the cord leaving about 2cm spare for ease in subsequent re-threading.
The Care and Maintenance page was compiled with the help of Simon de Souza.